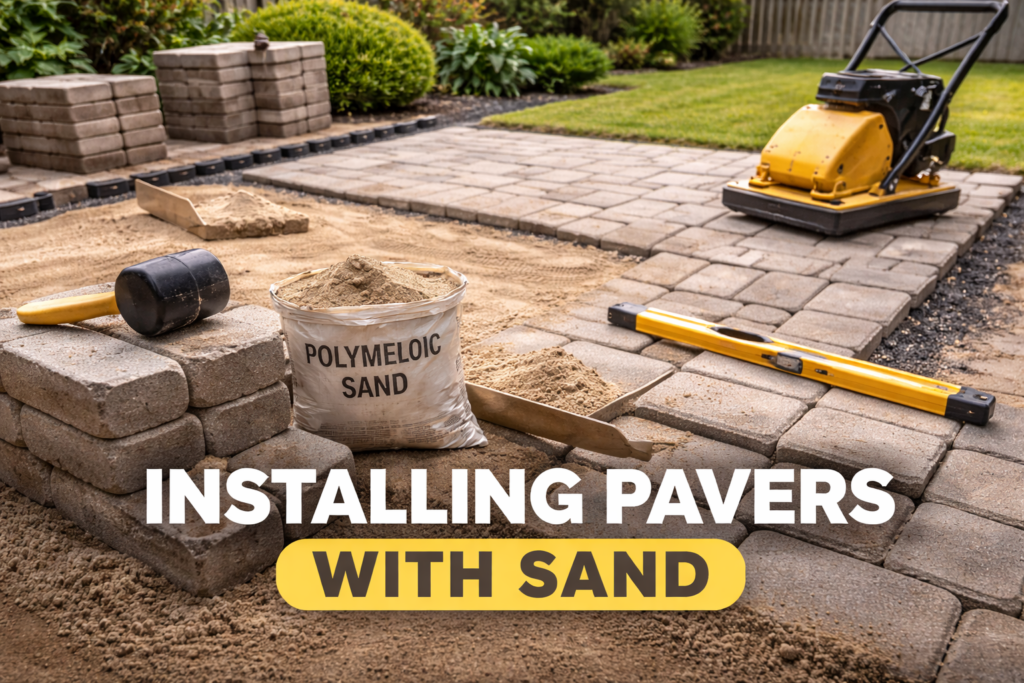
A well-installed paver patio can transform an ordinary backyard into a durable and visually appealing outdoor space. Whether you’re building a patio, walkway, or garden seating area, one of the most reliable and widely used techniques is installing pavers with sand using the dry installation method.
Unlike mortar-set stone or concrete installations, dry laid pavers rely on a compacted base and bedding sand to create a stable surface. This method is popular among contractors and DIY homeowners because it allows flexibility, easier repairs, and natural drainage.
In the landscaping and hardscape industry, dry installation has become the standard method for backyard patios because it balances durability, cost efficiency, and long-term maintenance flexibility.
I write this to guide explores the best practices for installing pavers using sand, including preparation, installation techniques, user feedback, and key considerations before starting your project.
What Is Dry Installation for Pavers?
Dry installation (also called sand-set installation) means that pavers are installed without cement or mortar. Instead, they are placed on a prepared base consisting of:
- compacted gravel base
- leveling sand layer
- pavers placed on top
- joint sand filling the gaps
This layered structure allows the surface to remain flexible while still supporting heavy loads.
Because pavers are individual units rather than a continuous slab, the system can absorb minor ground movement without cracking.
Why Sand-Based Installation Is Popular for Backyard Pavers
Dry installation offers several advantages compared with traditional concrete or mortar systems.
1. Natural Drainage
One of the biggest benefits is water permeability. Water drains through the sand joints and into the ground below, reducing:
- puddling
- runoff
- soil erosion
This is particularly beneficial in backyard landscaping where proper drainage is critical.
2. Flexibility During Ground Movement
Backyards often experience minor soil movement due to:
- seasonal temperature changes
- moisture variation
- root growth
Mortar installations can crack under these conditions, but dry paver systems can shift slightly without structural damage.
3. Easier Repairs
If a section becomes damaged or uneven, individual pavers can be removed and replaced without demolishing the entire surface.
Contractors and homeowners often appreciate this flexibility.
4. Cost Efficiency
Dry installation usually requires fewer materials and less labor compared with mortar installations. This makes it a practical option for larger patios and walkways.
Pros and Cons of Installing Pavers with Sand
Pros
Easier Installation
Compared with mortar systems, sand-set pavers are simpler and more forgiving, especially for DIY projects.
Better Drainage
Water passes through the joints rather than pooling on the surface.
Replaceable Units
Individual pavers can be lifted and replaced without major demolition.
Lower Cost
The installation process typically costs less than concrete or stone mortar systems.
Flexible Structure
The system adapts to small ground movements.
Cons
Potential for Weed Growth
If joint sand is not stabilized properly, weeds may grow between pavers.
Requires Proper Base Preparation
A poorly prepared base can cause pavers to sink or shift over time.
Occasional Maintenance
Joint sand may need replenishment after several years.
Not Ideal for Extremely Heavy Loads
For areas supporting large vehicles, additional base thickness may be required.
If you like to know about different kind of hardscape you can check the categories HERE.
Step-by-Step Guide: Installing Pavers Using Sand
Now for a Proper installation is the most important factor for long-term durability. Many paver failures occur because the base preparation was inadequate.
Below is a typical professional installation process.
Step 1: Planning and Layout
Before excavation begins, plan the patio layout carefully.
Consider:
- patio size
- slope for drainage
- surrounding landscape features
- edge restraints
Most professionals recommend a minimum slope of 1/8 inch per foot to direct water away from structures.
Use marking paint, stakes, or string lines to outline the installation area.
Step 2: Excavation
Excavation depth depends on the thickness of the base layers.
Typical backyard paver patios require:
- 4–6 inches of compacted gravel base
- 1 inch of bedding sand
- paver thickness (usually 2–3 inches)
This means the excavation depth usually ranges from 7–10 inches.
Proper excavation ensures the finished surface sits at the correct height.
Step 3: Installing the Gravel Base
The gravel base provides the structural foundation.
Most contractors use crushed stone or road base, which compacts tightly.
Installation process:
- Spread gravel in layers of about 2–3 inches.
- Compact each layer using a plate compactor.
- Repeat until the required thickness is reached.
This step is crucial. A weak base will lead to uneven or sinking pavers.
Step 4: Adding Bedding Sand
After the base is compacted, a layer of coarse bedding sand is installed.
This layer serves as a leveling surface for the pavers.
Important guidelines:
- thickness should be about 1 inch
- do not compact the sand before laying pavers
- screed the sand using straight boards or pipes
The sand should create a perfectly smooth surface for placing pavers.
Step 5: Laying the Pavers
Pavers should be installed starting from a fixed edge or corner.
Installation tips:
- place pavers gently onto the sand
- avoid sliding them across the surface
- maintain consistent joint spacing
Many installers use patterns such as:
- running bond
- herringbone
- basket weave
These patterns improve structural strength and visual appeal.
Step 6: Installing Edge Restraints
Edge restraints prevent pavers from spreading outward over time.
Common materials include:
- plastic edging systems
- aluminum edging
- concrete edge restraints
Without proper edge restraints, the patio can gradually lose its shape.
Step 7: Filling the Joints
After the pavers are installed, sand is swept into the joints.
There are two main options:
Regular Joint Sand
Affordable but may wash out over time.
Polymeric Sand
Contains binders that harden when wet, helping prevent weeds and erosion.
Many professionals now prefer polymeric sand for backyard installations.
Step 8: Final Compaction
A plate compactor is used to settle the pavers into the sand bed.
A protective mat should be placed under the compactor to prevent scratching the pavers.
After compaction:
- Sweep additional sand into joints
- Compact again
- Clean the surface
This process locks the pavers together.
To find more tools and thier application on flooring, you can check this category HERE.
Steel Tamper | Paver Removal Tool |
|---|---|
 | 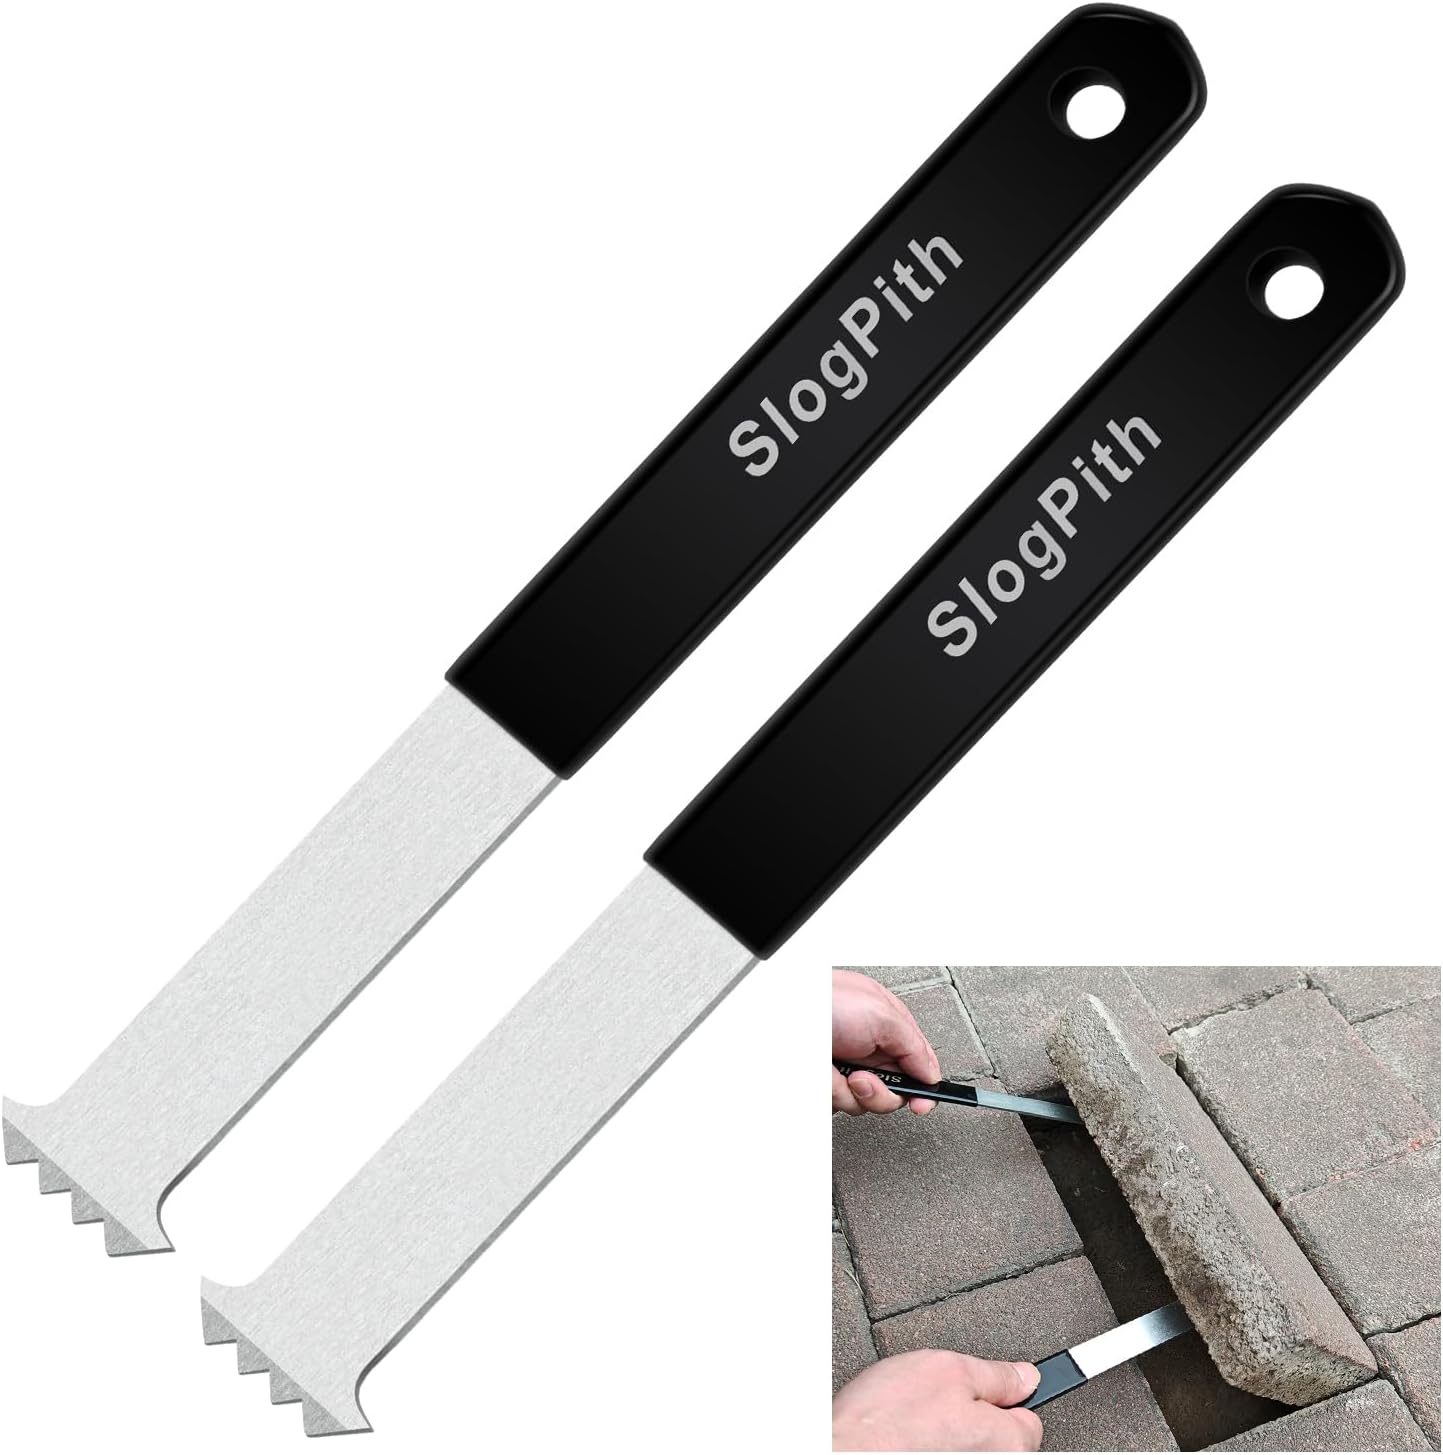 |
Welness Tamper | Puller Tool |
Real User Feedback from Homeowners and Contractors
Looking at discussions in landscaping forums, contractor groups, and homeowner reviews reveals several common experiences.
Positive Feedback
Many homeowners say sand-set paver patios provide a professional-looking backyard upgrade at a reasonable cost.
DIY installers often report that the project is manageable with basic tools if proper preparation is done.
Contractors frequently highlight the advantage of easy repairs compared with poured concrete patios.
Common Complaints
However, some users report problems when installation shortcuts are taken.
Typical complaints include:
- uneven pavers after a few seasons
- weed growth between joints
- sinking areas due to poor base compaction
Most of these issues are linked to insufficient base preparation, not the installation method itself.
Buying Considerations Before Installing Pavers
Before starting a paver project, it’s important to evaluate several factors.
1. Paver Quality
Different pavers vary in strength and durability.
Concrete pavers are often rated based on compressive strength and weather resistance.
Higher-quality pavers generally last longer and maintain color better.
2. Base Materials
The quality of gravel base material significantly affects long-term stability.
Look for well-graded crushed stone rather than rounded gravel.
3. Joint Sand Type
Polymeric sand costs more but offers better resistance against:
- weeds
- insect nests
- erosion
For most backyard patios, it is worth the investment.
4. Drainage Conditions
Proper drainage prevents water from weakening the base.
Ensure the patio slopes slightly away from structures.
5. Edge Restraints
Edge restraints are essential for maintaining structural integrity.
Skipping this step is one of the most common DIY mistakes.
Paver Slab Lifter | Polymeric Sand |
|---|---|
 |  |
Lifter | SRW PaverMate |
Maintenance Tips for Dry-Laid Paver Patios
A well-installed paver patio requires relatively little maintenance.
However, a few simple steps can extend its lifespan.
Periodic Joint Sand Refill
Joint sand may need replenishment every few years.
Weed Removal
Occasional weed removal keeps the surface clean.
Cleaning
Pressure washing or mild cleaners can remove dirt buildup.
Sealing (Optional)
Some homeowners apply sealers to enhance color and stain resistance.
If you like to know more about sealing you check this related post HERE.
Final Thoughts
Installing pavers using the sand-based dry installation method remains one of the most practical and durable solutions for backyard patios and walkways. When done correctly, this system provides excellent drainage, flexibility against ground movement, and long-term repairability.
The key to success lies in careful base preparation, proper edge restraint installation, and high-quality joint sand. By following these best practices, homeowners and contractors can create backyard paver surfaces that remain stable and visually appealing for many years.
Disclaimer:
This content is based on information from various sources and represents recommendations according to available data. Quality and correctness of products are the responsibility of manufacturers and sellers.
Leave a Reply