Removing old tile floors sounds simple until you actually start doing it. The first few tiles might come off easily, and then suddenly you hit a section that feels like it is glued to the earth.
I have seen projects that took a couple of hours turn into full weekend jobs just because the wrong tools were used. On the other hand, with the right setup, you can remove an entire room of tile much faster and with less frustration.
In this guide, I will walk you through the best tools for removing tile floors, what real users say about them, and how to choose based on your project.
You can find more topics on tools HERE.
Why Choosing the Right Tool Matters
Tile removal is not just about breaking tiles. You are also dealing with thinset mortar, adhesive layers, and sometimes very old installations that have hardened over time.
Using the wrong tool can:
- Slow down your progress
- Damage the subfloor
- Increase dust and cleanup
- Exhaust you physically
The right tool makes the job faster, cleaner, and much more controlled.
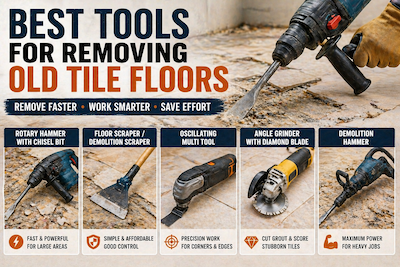
Best Tools for Removing Tile Floors
1. Rotary Hammer with Chisel Bit
This is one of the most effective tools for tile removal.
A rotary hammer delivers strong impact force that breaks tile and adhesive quickly. When paired with a flat chisel bit, it can slide under tiles and lift them efficiently.
Pros and Cons
| Pros | Cons |
|---|---|
| Very fast removal | Higher cost |
| Works on tough adhesives | Can damage subfloor if not careful |
| Reduces manual effort | Requires some skill |
| Ideal for large areas |
Tools |
|---|
 |
2. Floor Scraper or Demolition Scraper
This is a manual or long handled tool used to pry tiles off the floor.
It works best when tiles are already loose or poorly bonded.
Pros and Cons
| Pros | Cons |
|---|---|
| Affordable | Labor intensive |
| Simple to use | Slow for large areas |
| No power required | Limited effectiveness on strong adhesive |
| Good control |
Tools |
|---|
 |
3. Oscillating Multi Tool
This tool is not for removing entire floors but is extremely useful for edges, corners, and tight spaces.
It helps cut grout lines and loosen tiles before removal.
Pros and Cons
| Pros | Cons |
|---|---|
| Precise cutting | Not suitable for large areas |
| Great for detail work | Slower than heavy tools |
| Easy to control | |
| Reduces damage risk |
Tools |
|---|
 |
4. Angle Grinder with Diamond Blade
An angle grinder is useful for cutting grout lines and scoring tiles.
This makes removal easier, especially in stubborn sections.
Pros and Cons
| Pros | Cons |
|---|---|
| Powerful cutting ability | Creates dust |
| Helps loosen tiles | Requires safety precautions |
| Works on tough grout | |
| Versatile tool |
Tools |
|---|
 |
5. Demolition Hammer
For very large or commercial projects, a demolition hammer is often used.
It is similar to a rotary hammer but more powerful.
Pros and Cons
| Pros | Cons |
|---|---|
| Extremely powerful | Expensive |
| Fast for large areas | Heavy and tiring |
| Handles thick mortar | Not ideal for small jobs |
| Professional level tool |
Tools |
|---|
 |
Real User Feedback and Experience
When you look at real user experiences, a clear pattern appears.
Rotary hammer feedback
Most users say this is the best investment for tile removal. Many mention cutting their work time in half compared to manual tools.
However, beginners often say they needed a bit of practice to avoid damaging the subfloor.
Manual scraper feedback
Users like the control and simplicity, especially for small jobs. But for larger areas, many report fatigue and slow progress.
Angle grinder feedback
Users appreciate how it helps break stubborn sections, but almost everyone mentions dust as a major issue. Proper dust control is essential.
Demolition hammer feedback
Professionals love the speed and power. DIY users often say it feels like overkill unless working on a large space.
How to Remove Tile Floors Step by Step
Step 1: Prepare the area
Remove furniture and cover nearby surfaces. Tile removal creates dust and debris.
Step 2: Start with a loose tile
Find a weak spot or cracked tile to begin.
Step 3: Use the right tool
- Use a rotary hammer for bulk removal
- Use a scraper for smaller areas
- Use an oscillating tool for edges
Step 4: Remove adhesive
After tiles are gone, you will still need to remove thinset or adhesive.
Step 5: Clean and inspect subfloor
Make sure the surface is smooth and ready for new flooring.
Common Mistakes to Avoid
- Starting without protective gear
- Using manual tools for large projects
- Ignoring dust control
- Damaging the subfloor with aggressive tools
- Skipping adhesive removal
Buying Considerations
Project size
For small rooms, manual tools might be enough. For larger areas, power tools are worth it.
Budget
Manual tools are cheaper, but power tools save time and effort.
Skill level
If you are new, start with simpler tools before using heavy equipment.
Type of tile and adhesive
Older installations can be much harder to remove and require stronger tools.
Final Thoughts
There is no single tool that works best for every situation. The right choice depends on your project size, budget, and experience.
If you want speed and efficiency, a rotary hammer is hard to beat. For smaller or more controlled work, manual tools and precision tools still have their place.
The key is combining the right tools rather than relying on just one.
Disclaimer
This content is based on information from various sources and represents recommendations according to available data. Quality and correctness of products are the responsibility of manufacturers and sellers.
Leave a Reply