
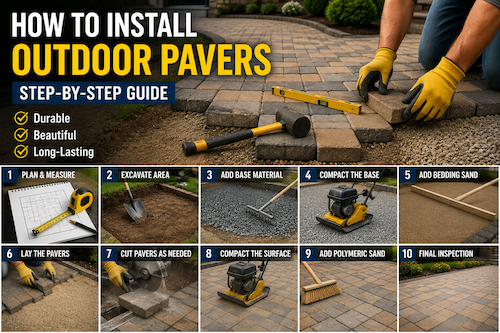
Installing outdoor pavers is one of those projects that can completely transform a backyard, patio, walkway, or driveway. A well-installed paver surface adds value to a property, improves usability, and creates an outdoor space that can last for decades.
What surprises many homeowners is that the success of a paver project has less to do with the pavers themselves and more to do with what is underneath them. Even premium pavers can shift, sink, or become uneven if the base preparation is poor.
The good news is that installing pavers is a project many homeowners can tackle themselves with patience, proper planning, and the right tools.
In this guide, I’ll walk you through the entire process of installing outdoor pavers step by step, including preparation, materials, installation techniques, common mistakes, and practical tips gathered from real-world projects.
see more post regard the interiors and exteriors hacks HERE.
Why Pavers Are a Popular Outdoor Flooring Choice
Outdoor pavers remain one of the most popular hardscape materials because they offer a combination of durability and design flexibility.
Homeowners commonly use pavers for:
- Patios
- Walkways
- Pool decks
- Garden paths
- Outdoor kitchens
- Driveways
- Courtyards
Unlike poured concrete, individual pavers can often be replaced if damaged, making long-term maintenance easier.
Pros and Cons of Installing Outdoor Pavers
| Pros | Cons |
|---|---|
| Durable and long-lasting | Labor-intensive installation |
| Wide variety of styles and colors | Requires proper base preparation |
| Easy to repair individual sections | Initial cost can be higher than concrete |
| Adds property value | Weed growth can occur without maintenance |
| Excellent drainage when installed correctly | Some tools may need to be rented |
Tools and Materials You’ll Need
Before starting, gather the necessary tools and materials.
Essential Tools
- Tape measure
- Shovel
- Wheelbarrow
- String line
- Stakes
- Rubber mallet
- Level
- Screed board
- Plate compactor
- Masonry saw or paver cutter
- Broom
Materials
- Pavers
- Crushed stone base material
- Bedding sand
- Edge restraints
- Polymeric sand
- Geotextile fabric (optional but recommended)
Masonary Saw |
|---|
 |
Step 1: Plan and Measure the Area
The first step is deciding exactly where the pavers will be installed.
Use stakes and string lines to outline the project area.
Take measurements carefully and calculate:
- Total square footage
- Number of pavers needed
- Base material requirements
- Sand requirements
Most professionals recommend purchasing 5% to 10% extra pavers to account for cuts and future repairs.
Step 2: Choose the Right Paver Type
Not all pavers are designed for the same applications.
Popular Options Include
Concrete Pavers
Affordable and available in many styles.
Natural Stone Pavers
Premium appearance with unique color variations.
Porcelain Pavers
Increasingly popular for modern outdoor spaces.
Clay Brick Pavers
Traditional appearance and excellent durability.
Consider:
- Climate
- Traffic load
- Maintenance expectations
- Design style
before making your final choice.
Step 3: Excavate the Area
Excavation is one of the most important stages of the project.
Remove existing grass, soil, and debris.
Typical excavation depths:
Walkways and Patios
6 to 8 inches
Driveways
10 to 14 inches
Always verify local conditions and soil requirements.
A common mistake is not digging deep enough, which can lead to settling problems later.
Step 4: Install Geotextile Fabric
Many professional installers use geotextile fabric to separate soil from the aggregate base.
Benefits include:
- Improved stability
- Reduced weed growth
- Better drainage
- Less base contamination
While not mandatory, it can significantly improve long-term performance.
Step 5: Build the Base Layer
The base is the foundation of the entire project.
Use crushed angular stone rather than rounded gravel.
Install the base in layers.
Recommended Process
- Add approximately 2 inches of crushed stone.
- Compact thoroughly.
- Repeat until desired depth is reached.
Compaction is critical.
A properly compacted base prevents future settling and movement.
Step 6: Create Proper Slope
Water management is essential.
Outdoor paver surfaces should slope away from structures.
A common guideline is:
Approximately one-quarter inch drop per foot.
This helps direct water away from buildings and prevents standing water.
Step 7: Install Edge Restraints
Edge restraints help keep pavers from shifting over time.
Install them around the perimeter before placing pavers.
Popular options include:
- Plastic edging
- Aluminum edging
- Concrete restraints
Skipping this step is one of the most common DIY mistakes.
Step 8: Add Bedding Sand
The bedding layer helps create a smooth surface for laying pavers.
Use concrete sand or bedding sand specifically designed for paver installation.
Spread approximately 1 inch of sand.
Then use screed rails and a straight board to level the surface.
Avoid walking on the screeded sand after leveling.
Step 9: Lay the Pavers
Now comes the rewarding part.
Begin from a straight edge and work outward.
Popular patterns include:
Running Bond
Simple and beginner-friendly.
Herringbone
Excellent strength for driveways.
Basket Weave
Traditional decorative appearance.
Modular Patterns
Often used with natural stone.
Place each paver carefully and maintain consistent spacing.
Use a rubber mallet to gently seat pavers into the bedding layer.
Step 10: Cut Pavers as Needed
Most projects require some cuts around edges and corners.
Common cutting tools include:
- Wet saws
- Masonry saws
- Paver splitters
Always wear proper safety equipment.
Accurate cuts significantly improve the finished appearance.
Step 11: Compact the Surface
Once all pavers are installed, use a plate compactor to settle them into the bedding sand.
Many professionals recommend using a protective pad beneath the compactor to avoid scratching decorative pavers.
Compaction helps:
- Level the surface
- Improve stability
- Lock pavers together
Step 12: Apply Polymeric Sand
Polymeric sand fills the joints between pavers.
Benefits include:
- Reduced weed growth
- Improved stability
- Better resistance to insects
- Reduced washout
Sweep the sand thoroughly into all joints.
Follow manufacturer instructions regarding activation with water.
Step 13: Final Inspection and Cleanup
Inspect the finished surface carefully.
Check for:
- Uneven pavers
- Gaps
- Missing joint sand
- Drainage issues
Make any final adjustments before using the area.
Common Mistakes to Avoid
After reading countless homeowner reviews and contractor discussions, several mistakes appear repeatedly.
Poor Base Preparation
Most paver failures start below the surface.
Insufficient Compaction
Loose aggregate eventually settles.
Wrong Sand Selection
Play sand and masonry sand are not suitable substitutes for bedding materials.
Ignoring Drainage
Water is often the biggest enemy of outdoor hardscapes.
Skipping Edge Restraints
This often leads to spreading and movement over time.
What Homeowners Say After Their First Paver Project
Many first-time installers report the same experience.
The actual placement of pavers is easier than expected.
The preparation work is where most of the effort happens.
Common homeowner observations include:
- Excavation takes longer than expected.
- Base preparation is more important than appearance.
- Renting a plate compactor is worth the cost.
- Taking extra time with layout improves results significantly.
Interestingly, people who rush the preparation stage are usually the ones who encounter problems later.
Buying Considerations Before Starting
Before purchasing materials, consider:
Climate
Freeze-thaw regions may require thicker base layers.
Intended Use
Driveways need stronger foundations than patios.
Drainage Conditions
Poorly draining soils may require additional preparation.
Maintenance Expectations
Some materials require sealing and periodic upkeep.
Budget
Higher-quality materials often provide better long-term value.
Level |
|---|
 |
Final Thoughts
Installing outdoor pavers is a project that rewards careful planning and attention to detail. While it requires physical effort and patience, the results can completely transform an outdoor space.
The most important lesson is simple: focus on the foundation. A properly excavated, compacted, and graded base is what separates a paver surface that lasts five years from one that lasts twenty.
Take your time, use quality materials, and don’t rush the preparation stages. If you do, you’ll end up with a patio, walkway, or driveway that looks professional and performs reliably for years to come.
Disclaimer
This content is based on information from various sources and represents recommendations according to available data. Quality and correctness of products are the responsibility of manufacturers and sellers.
Leave a Reply