Large natural stone slabs on walls create a bold architectural statement. Whether used for an interior accent wall, fireplace surround, or exterior facade, stone slabs provide texture, durability, and a timeless appearance that manufactured materials struggle to replicate.
However, installing big natural stone slabs on a wall is not the same as installing tile or thin veneer. These slabs are heavy, often irregular, and require proper structural preparation, adhesives, and installation techniques.
Many DIY installers underestimate the importance of wall preparation and weight distribution. If the installation is not done correctly, slabs can shift, crack, or detach over time.
This guide explores the best way to install natural stone slabs on a wall, including preparation steps, installation techniques, user experiences, and important buying considerations.
Why Natural Stone Slabs Are Popular for Wall Design
Natural stone slabs have become increasingly popular in both residential and commercial design. Architects and homeowners often choose them because they provide a premium, organic look that synthetic materials cannot easily replicate.
Some common applications include:
- feature walls in living rooms
- fireplace surrounds
- outdoor garden walls
- entryway statement walls
- exterior cladding for modern homes
The large format of stone slabs reduces grout lines and creates a clean, monolithic appearance.
Types of Natural Stone Used for Wall Slabs
Not all stones behave the same during installation. The type of stone can affect weight, cutting difficulty, and adhesion.
Common natural stone slabs include:
Granite
Granite is extremely durable and dense. It works well for interior and exterior walls but can be heavy and difficult to cut.
Limestone
Limestone slabs offer a softer, natural appearance and are easier to shape, but they require sealing.
Sandstone
Sandstone is widely used for decorative walls and outdoor applications because of its warm color variations.
Slate
Slate slabs provide dramatic texture and layered surfaces often used for modern feature walls.
Each stone type may require slightly different installation methods depending on thickness and weight.
You can find more information about natural stone hardscape on this page HERE.
Adjustable Suction | Adjustable Angel Suction |
|---|---|
 |  |
Check Prices on Amazon | |
Pros and Cons of Installing Large Stone Slabs on Walls
| Feature | Pros | Cons |
|---|---|---|
| Visual Impact | Creates a premium, natural appearance | Large slabs require careful alignment |
| Durability | Extremely long-lasting material | Heavy weight requires strong wall support |
| Maintenance | Stone surfaces resist wear | Some stones require periodic sealing |
| Design Flexibility | Unique textures and colors | Cutting and shaping can be difficult |
| Property Value | Often increases home value | Installation cost can be higher |
This balance explains why many designers recommend stone slabs for feature walls rather than entire rooms.
What Users and Contractors Say About Stone Slab Walls
Feedback from homeowner forums, contractor reviews, and renovation communities provides helpful insight into real-world installation experiences.
Positive Experiences
Many homeowners report that stone slab accent walls dramatically transform a space. Users frequently mention that guests immediately notice the wall when entering a room.
Contractors also highlight that natural stone creates a high-end architectural finish compared with standard drywall or wallpaper.
Another common positive comment is durability. Once properly installed, stone walls can last for decades with minimal maintenance.
Common Challenges Reported
However, several issues appear repeatedly in user discussions.
Some DIY installers mention that large slabs are much heavier than expected, making them difficult to handle without assistance.
Others report problems when using the wrong adhesive or skipping mechanical anchors. In rare cases, slabs loosen over time if not properly secured.
Professional installers often emphasize that surface preparation is the most important step, more than the stone itself.
Best Surface Preparation for Stone Wall Installation
Proper preparation determines whether a stone slab wall lasts years or decades.
Check Structural Support
Walls must be capable of supporting the weight of natural stone slabs. Interior drywall alone is often not strong enough.
Many installers reinforce walls using:
- cement backer board
- metal lath and mortar
- reinforced plywood underlayment
For exterior installations, concrete or masonry walls provide the best base.
Clean the Surface
Dust, grease, and loose material can weaken adhesive bonding. Surfaces should be thoroughly cleaned before installation.
Apply Waterproofing (if needed)
In kitchens, bathrooms, or exterior areas, a waterproof membrane helps prevent moisture damage behind the stone.
Tools Needed for Installing Stone Slabs on Walls
Working with large natural stone pieces requires specific tools.
Typical installation tools include:
- wet saw with diamond blade
- masonry drill
- tile leveling system
- heavy-duty stone adhesive or thinset mortar
- rubber mallet
- notched trowel
- spacers or leveling clips
Safety equipment such as gloves and eye protection is also important when cutting stone.
If you like to see different tools for flooring, you check the following category page HERE.
Rubber Mallet | Tile Leveling |
|---|---|
 |  |
Check on Amazon | Check on Amazon |
Step-by-Step Guide to Installing Large Stone Slabs
Installing large stone slabs requires patience and careful alignment.
Step 1: Plan the Layout
Before attaching any slabs, dry-fit them on the floor.
This helps determine:
- natural pattern alignment
- placement of seams
- necessary cuts
Mark the wall to guide installation.
Step 2: Apply Adhesive or Mortar
Use a high-strength stone adhesive or polymer-modified thinset mortar designed for heavy materials.
Spread the adhesive using a notched trowel.
For larger slabs, installers often apply back-buttering, meaning adhesive is applied both to the wall and the slab.
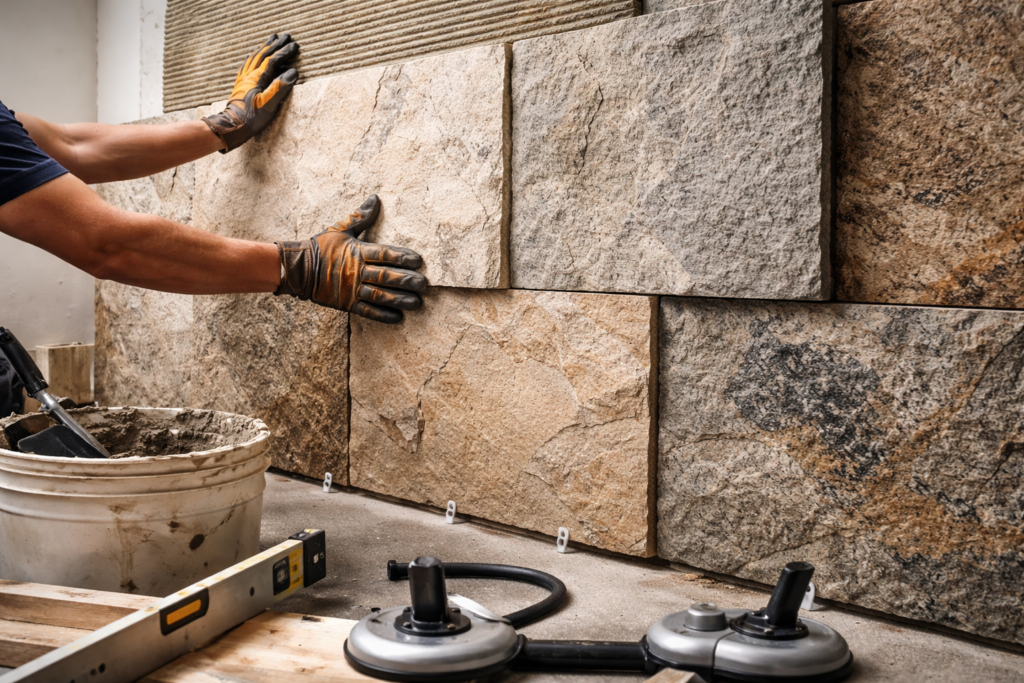
Step 3: Position the Slab
Carefully lift the slab and press it against the wall.
Because stone slabs are heavy, installers often use:
- suction cup lifters
- temporary support brackets
- leveling systems
These tools help keep slabs aligned while the adhesive cures.
Step 4: Level and Secure the Stone
Check alignment with a level before the adhesive begins to set.
Tap the slab gently with a rubber mallet to remove air pockets.
Step 5: Allow Adhesive to Cure
Most adhesives require 24–48 hours of curing time before applying grout or sealant.
During this time, avoid disturbing the slabs.
Adhesives and Mortars for Stone Slab Walls
Choosing the right adhesive is critical.
Common options include:
Polymer-Modified Thinset
This is the most common adhesive used for stone slabs because it provides strong bonding and flexibility.
Epoxy Stone Adhesive
Epoxy adhesives offer extremely strong bonding and are sometimes used for very heavy slabs.
Mortar Bed Installation
For very large or irregular stones, a thick mortar bed may be applied to secure the slabs.
Contractors typically choose the method based on stone thickness and wall type.
Buying Considerations Before Installing Stone Slabs
Selecting the right materials makes installation easier and ensures better results.
Stone Thickness
Large slabs typically range between ¾ inch and 2 inches thick. Thicker slabs are stronger but heavier.
Stone Weight
Weight determines whether additional structural support is required.
Exterior walls and fireplaces often require reinforced mounting systems.
Surface Finish
Stone slabs come in finishes such as:
- honed
- polished
- natural split face
- brushed
The finish affects both appearance and maintenance requirements.
Sealing Requirements
Some stones, especially limestone and sandstone, require sealing to prevent stains and moisture absorption.
Installation Cost
Stone slab installation can vary significantly depending on:
- slab size
- stone type
- wall height
- labor complexity
Large feature walls often require professional installation.
When Professional Installation Is Recommended
While experienced DIY builders can install smaller slabs, professionals are usually recommended when:
- slabs are extremely large or heavy
- walls require structural reinforcement
- exterior facades are involved
- precision pattern alignment is required
Professionals also have specialized lifting tools that reduce the risk of damaging expensive stone pieces.
 |  |
Final Thoughts
Installing large natural stone slabs on walls can dramatically transform both interior and exterior spaces. When done correctly, stone walls offer unmatched durability, texture, and visual impact.
However, success depends on proper preparation, the right adhesive system, and careful alignment during installation. Because large slabs can be heavy and difficult to maneuver, planning and structural support are critical.
Homeowners who take the time to prepare the wall surface properly and use appropriate installation techniques can create a stunning stone feature that lasts for decades.
Natural stone remains one of the most timeless building materials available, and with the right installation method, it continues to be a reliable choice for modern architectural design.
Disclaimer:
This content is based on information from various sources and represents recommendations according to available data. Quality and correctness of products are the responsibility of manufacturers and sellers.
Leave a Reply